Guns Germs And Steel
I’ve never been a big history fan. Too many names and dates to memorize. But now, free from the pressure of having to learn for the sake of getting good grad...
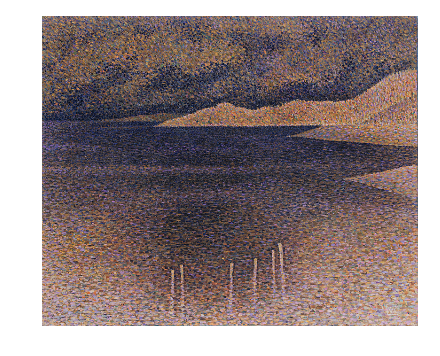
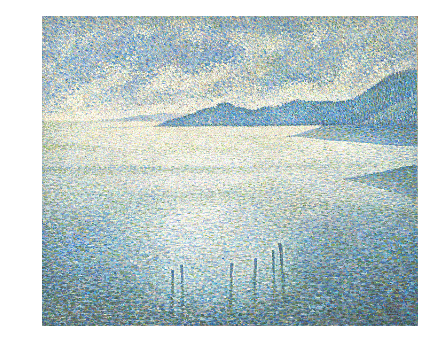
While working on the first part of my style-transfer project, I used pyplot’s imshow to diplay images in the notebook. However, it took me a little bit of playing around before the images looked as I expected them to. For reference, here is how I might load the original image and what it would look like:
image = cv2.imread('../coastal_scene.jpg')
image = cv2.cvtColor(image, cv2.COLOR_BGR2RGB)

To better simulate the kind of data I was working with, I’ll cast this image to a float, keeping the values the same though. The reason I’m doing this is because the input to my network, the image I was optimizing and trying to view, was of the type float32. Here’s the same image but in float format:
image_float = np.array(image, dtype=np.float32)
So it’s obviously wrong but at least it’s still possible to tell that the underlying array does have some relationship to the original images. However, this is only happening because the values are exactly the same even though the data type is different. During the image optimization procedure, the values only start to look similar a little later during training. To simulate what it might look like earlier on, I’ll add some noise to the image and show you what it looks like:
height, width, channels = np.shape(image)
image_noise = np.random.rand(height, width, channels) * 50
image_invalid = image + image_noise
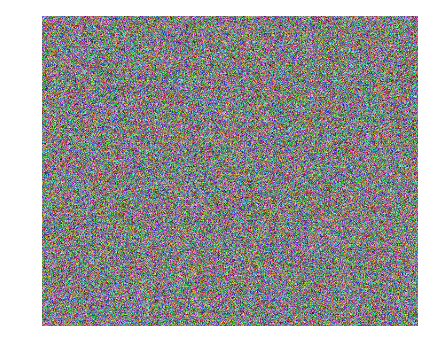
I saw images like this so many times during training and it drove me crazy! Thankfully I was able to use cv2 and tensorboard to view images and could see images that made more sense. Looking a little closer at the documenation for imshow, I found this not-so-fine-print:
Elements of RGB and RGBA arrays represent pixels of an MxN image. All values should be in the range [0 .. 1] for floats or [0 .. 255] or integers. Out-of-range values will be clipped to these bounds.
I was using floats in the range [0 .. 255] and there were being clipped to [0 .. 1]. The rubbish I was seeing made some sense. So let’s cast the array to uint8 so the values aren’t clipped:
image_invalid_int = np.array(image_invalid, dtype=np.uint8)
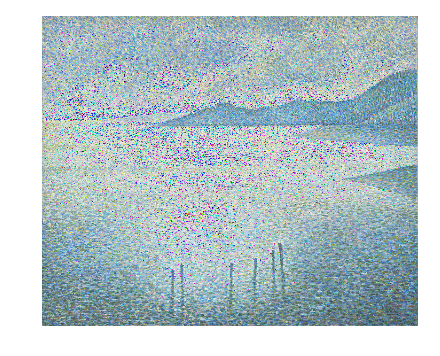
Better but it’s still not quite right. The final issue comes from what happens when you cast from float32s to uint8s. The maximum value that uint8 can have is 255. Go any higher, as I did when I added noise to the image in float format and the value will wrap around! So 256 becomes 0, 257 becomes 1, and so on.
So before casting the image to uint8, we should clip the values to be within the [0 .. 255] range. Here’s one way to go about it:
image_clipped = np.clip(initial_image, 0, 255)
image_rounded = np.rint(image_clipped)
formatted_image = np.asarray(image_rounded, dtype=np.uint8)
The rint function round floats to ints properly. If I skipped that, values like 1.5 are truncated to 1. Honestly, the images would likely look the same whether the floats are rounded or truncated but the former is more ‘correct’ so I chose that instead. Plus, once this image formatting is wrapped up in a separate function, you won’t even have to go through the hassle of typing that extra line each time you want to format an image so why not go all the way?
For comparison, I’ve shown the original image on the left and the noisy, formatted image on the right:
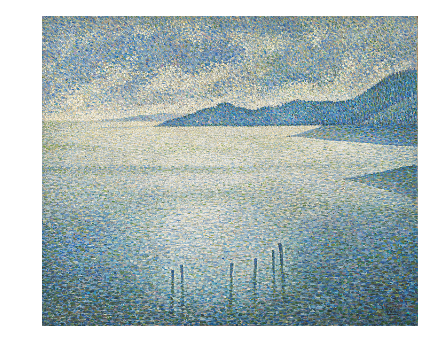
If you look carefully, you’ll notice that the images aren’t quite the same. This is because there’s still the additive noise introduced and the formatting doesn’t get rid of that completely. Lots of previously smaller pixel channel values are now at 255. However, in the image optimization context, as training progresses, fewer pixels will be out of bounds and this effect will be less noticeable.
So when working with images and pyplot, be wary of the little subtleties! I advise you to create a formatting function (it would probably contain the 3 lines from the last snippet) and use that on an image before displaying it.
If you’d like to play around more, here’s a notebook for you to tinker with! It’s even got a copy of the formatting function that I mentioned if you would like.
I’ve never been a big history fan. Too many names and dates to memorize. But now, free from the pressure of having to learn for the sake of getting good grad...
A little while ago, I read Letters from a Stoic by Seneca (translated and edited by Robin Campbell). I got a lot out of reading Letters and wanted to encoura...
I recently finished reading Every Tool’s a Hammer: Life Is What You Make It1 by Adam Savage. It was an energizing read and I highly recommend this book to fe...
CoordConv
Recently, I binged through the Culture series by Ian M. Banks. It was an amazing read and I thought a write up about it might help ground the experience and ...
I recently the following on Coursera: Learning How to Learn: Powerful mental tools to help you master tough subjects Mindshift: Break Through Obstacles ...
If you’re reading this, I’m assuming that you’ve read the paper Image Style Transfer Using Convolutional Neural Networks and have some familiarity with it.
While working on the second part of my style-transfer project, I needed to obtain the shape of a tensor. I decided to try using the tf.shape function.
If you’re reading this, I’m assuming that you’ve read the paper Image Style Transfer Using Convolutional Neural Networks and have some familiarity with it.
While working on the first part of my style-transfer project, I had: A new input variable which would have to be initialized from scratch. The VGG-19 ne...
While working on the first part of my style-transfer project, I found out the hard way that TF is very sensitive to the network’s input’s data type.
While working on the first part of my style-transfer project, I dealt with two main variable groups: The input variable which was the image I was optimizi...
While working on the first part of my style-transfer project, I used pyplot’s imshow to diplay images in the notebook. However, it took me a little bit of pl...
While working on the first part of my style-transfer project, I used Open CV’s cv2.imwrite to save images to disk. However, the images seemed to have a weird...
While working on the first part of my style-transfer project, I ran into lots of image issues. One of the issues was that cv2 uses a BGR channel order inste...
If you’re reading this, I’m assuming that you’ve read the paper Image Style Transfer Using Convolutional Neural Networks and have some familiarity with it.
Cue customary Hello World.